Introduction
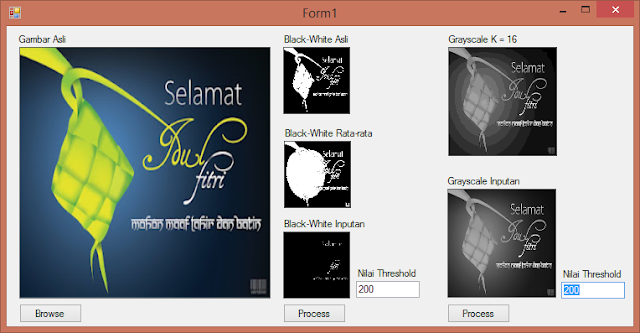
This time we will share how to create an application to change the threshold value from black-and-white to the average value of the gray degree of all points and add textBox so that the user can change the threshold value according to the user's wishes. Besides that we also will add textBox to input quantization value. So the user can change the quantization as desired.
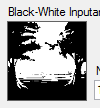
 |
| Application Screenshoot |
A black-and-white image is an image that contains only black or white. Black is valued 0 and white is valued 255. To make the picture in black and white, the original color will be gray degree and each pixel will be compared with its threshold value. Normally, the black-and-white degree image has a 128 threshold value, so if the color value is less than 128, then the color is changed to 0 (black), and which is greater than or equal to 128 will be converted to 255 (white). Consider the example image below.
Figure 1. The original image is predominantly dark
When viewed, the color composition of Figure 1 of the most dominant color is black. There is a blue color, it's just dark blue that the composition of its RGB value close to black. So when converted to black and white with threshold 128, it will be very close to black. Then when converted to black and white with an average threshold of the entire color on each pixel, it will show some white color that is spread in black. This is because in the original picture, there is also a distribution of blue in black. Here is a black-and-white image view of Figure 1.
 |
| Figure 2. Degree's result of black and white |
Take a look at the other images below.
 |
| Figure 3. The original image is predominantly white |
Different from Figure 1, in Figure 3 has a much brighter color composition. White compositions appear to be more dominant. Although there is a green and brown color, but both colors are classified as bright, so the composition of its RGB value close to 255. So when converted to black and white with normal threshold 128, it will be very close to white. Then when converted to black and white with an average threshold of the entire color on each pixel, it will show some black color scattered in white. This is because in the original picture, there is also a distribution of green, brown, blue, and other colors other than white. Here is a black-and-white image view of Figure 3.
 |
| Figure 4. Degree's result of black and white |
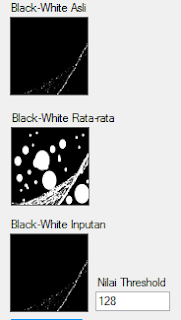
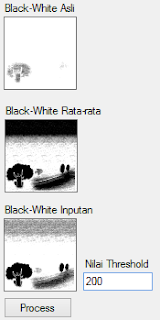
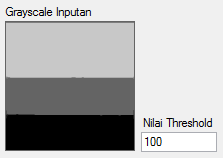
In this application, the threshold value can also be set via input. If the normal threshold value for black and white is 128, then in this application can be set as desired. Look at the image below.
 |
| Figure 5. The original image for black-and-white degree with custom threshold |
In contrast to the previous two images, Figure 5 has a more variable color composition. Below is an example when Figure 5 is changed to a degree of black and white with a normal threshold value.
 |
| Figure 6. Degrees of black and white with normal threshold values |
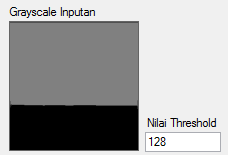
Figure 6 is a normal black and white color. The composition of black and white looks balanced when compared with the normal image. This is because the threshold value is exactly in the middle of the value 0 to 255. So have the same comparison, ie 1: 1. The image below is an example when the threshold value is close to 0.
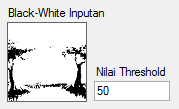 |
| Figure 7. The black and white degree with the threshold value close to black |
Figure 7 is a color with a degree of black and white with a threshold value of 50. It can be seen that the white color is more dominant when compared with white on normal threshold. This is because the threshold value is close to 0, or the black value. So the color composition on the black and white degree has a greater ratio for white. When calculated, the color ratio in Figure 7 is 50: 205, 50 for black, 205 for white. The image below is an example when the threshold value approaches 255.
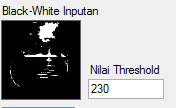 |
| Figure 8. Degrees of black and white with threshold values close to white |
Figure 8 is a color with a degree of black and white with a threshold value of 230. It can be seen that the black color is more dominant when compared with black in normal threshold. This is because the value of the threshold approaches the value of 255, or the white value. So the color composition on the black and white degree has a greater ratio for black. When calculated, the color ratio in Fig. 7 is 230: 25, 230 for black, 25 for white. The process of image quantization is the process of changing the number of gray values, to 8 or 16 gray levels. To quantize n step values, use the following quantization formula:
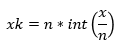 |
| Figure 9. Quantization Formula |
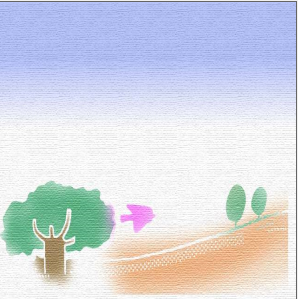
Consider the example image below.
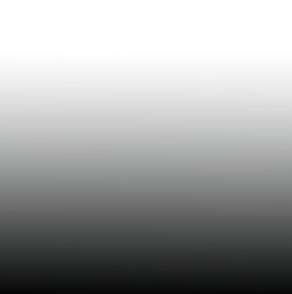 |
| Figure 10. Gradient images for quantization |
Figure 10 is the right image for quantization experiments, because it has a good degree of color gradation. Although the color gradation used is not black and white, it is not a problem because it will be used as a grayscale color first. Because grayscale color processing is much lighter when compared to colorful.
Each quantization has a value of k, or number of steps, affecting the number of color divisions and the composition of the color itself. The picture below is a quantization example with k worth 16.
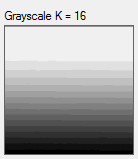 |
| Figure 11. Figure with 16 quantization |
Seen in Figure 11 which has a k worth of 16 that has a different cheolor division. The smaller the value of k, the more color division. This is because the value of k is the value of the color division step. So every 16 pixels once, the image does the color division. For more details, try using quantization with a larger k value.
 |
| Figure 12. Images with quantization values 100 |
Seen in Figure 12 there are three color divisions. Because in principle, Figure 12 performs a color division for every 100 pixels. Each 100 pixel color will be calculated by the quantization formula in Fig. 9 and from that formula will produce the color. The resulting color that will be used as a quantization color. So the three color division is not equal.
Look at the picture below.
 |
| Figure 13. Images with quantization values 128 |
Figure 13 is quantized with the value of k 128, or the middle value of the color range. Visible colors are divided into two parts. But why is there no white color? Precisely what looks just a gray color? This is because the maximum color value that will be generated by the quantization formula is 128. To better understand it, use 3 color samples, which are 10, 128, and 240 for each k with values 128 and 240.
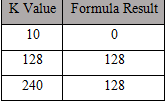 |
| Table 1. Maximum color values for threshold 128. |
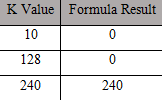 |
| Table 2. Maximum color values for 240 thresholds. |
From comparison between Table 1 and Table 2 it can be seen that the maximum value of both tables is different. In Table 2 has a maximum color value of 240. So the maximum color that will be produced is white with a value of 240. Here is the picture.
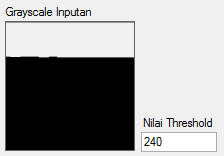 |
| Figure 14. Quantization with a value of k 240 |
Source Code
namespace Image
{
    public partial class ImageForm : Form
    {
        public Bitmap originalBitmap;
        public Bitmap originalBWBitmap, averageBWBitmap, optionalBWBitmap;
  public Bitmap originalGrayscaleBitmap, optionalGrayscaleBitmap;
        public int averageBWColor;

        public ImageForm()
        {
            InitializeComponent();
        }

        private void browseButton_Click(object sender, EventArgs e)
        {
            DialogResult d = openFileDialog.ShowDialog();
            if (d == DialogResult.OK)
            {
                originalBitmap = new Bitmap(openFileDialog.FileName);
                originalPictureBox.Image = originalBitmap;
            }
            int sumPixel = 0;
            for (int x = 0; x < originalBitmap.Width; x++)
            {
                for (int y = 0; y < originalBitmap.Height; y++)
                {
                    Color w = originalBitmap.GetPixel(x, y);
                    averageBWColor += (int)((w.R + w.G + w.B) / 3);
                    sumPixel++;
                }
            }
            averageBWColor /= sumPixel;
        }

        private void BWProcessButton_Click(object sender, EventArgs e)
        {
            originalBWBitmap = new Bitmap(originalBitmap);
            optionalBWBitmap = new Bitmap(originalBitmap);
            averageBWBitmap = new Bitmap(originalBitmap);
            for (int x = 0; x < originalBitmap.Width; x++)
            {
                for (int y = 0; y < originalBitmap.Height; y++)
                {
                    Color color = originalBitmap.GetPixel(x, y);
                    int rgbGray = (int)((color.R + color.G + color.B) / 3);
                    int originalGray = 0;
                    int averageGray = 0;
                    int optionalGray = 0;
                    if (rgbGray >= 128)
                    {
                        originalGray = 255;
                    }
                    if (rgbGray >= averageBWColor)
                    {
                        averageGray = 255;
                    }
                    if (rgbGray >= Convert.ToInt16(thresholdBWTextBox.Text))
                    {
                        optionalGray = 255;
                    }
                    Color newColorOriginal = Color.FromArgb(originalGray, originalGray, originalGray);
                    Color newColorAverage = Color.FromArgb(averageGray, averageGray, averageGray);
                    Color newColorOptional = Color.FromArgb(optionalGray, optionalGray, optionalGray);
                    originalBWBitmap.SetPixel(x, y, newColorOriginal);
                    averageBWBitmap.SetPixel(x, y, newColorAverage);
                    optionalBWBitmap.SetPixel(x, y, newColorOptional);
                }
            }
            originalBWPictureBox.Image = originalBWBitmap;
            averageBWPictureBox.Image = averageBWBitmap;
            optionBWPictureBox.Image = optionalBWBitmap;
        }

        private void grayscaleProcessButton_Click(object sender, EventArgs e)
        {
            originalGrayscaleBitmap = new Bitmap(originalBitmap);
            optionalGrayscaleBitmap = new Bitmap(originalBitmap);
            for (int x = 0; x < originalBitmap.Width; x++)
            {
                for (int y = 0; y < originalBitmap.Height; y++)
                {
                    Color color = originalBitmap.GetPixel(x, y);
                    int rgbGray = (int)((color.R + color.G + color.B) / 3);
                    int originalGrayscale = 16 * ((int)(rgbGray / 16));
                    int optionalGrayscale = Convert.ToInt16(thresholdGrayscaleTextBox.Text) * ((int)(rgbGray / Convert.ToInt16(thresholdGrayscaleTextBox.Text)));
                    Color newColorOriginal = Color.FromArgb(originalGrayscale, originalGrayscale, originalGrayscale);
                    Color newColorOptional = Color.FromArgb(optionalGrayscale, optionalGrayscale, optionalGrayscale);
                    originalGrayscaleBitmap.SetPixel(x, y, newColorOriginal);
                    optionalGrayscaleBitmap.SetPixel(x, y, newColorOptional);
                }
            }
            originalGrayscalePictureBox.Image = originalGrayscaleBitmap;
            optionGrayscalePictureBox.Image = optionalGrayscaleBitmap;
        }
    }
}


Comments
Post a Comment