How To Use HAProxy to Set Up HTTP Load Balancer
HAProxy is a free, very fast and reliable solution offering high availability, load balancing, and proxying for TCP and HTTP-based applications. It is really suited for very high traffic web sites and powers quite a number of the world's most visited ones. Over distributed and distributed by default in cloud platforms.
In this case, we use 6 server to setup this environment. 1 server for main web, 4 server for nginx balancer and 1 server for HAProxy.

main web server :
192.168.1.10
nginx node-1 :
192.168.1.11
nginx node-2 :
192.168.1.12
nginx node-3 :
192.168.1.13
nginx node-4 :
192.168.1.14
HAProxy :
192.168.1.15
In main web server, put your code of web app that you build.
In nginx node 1 - 4 configure proxy pass to protect main web server.
Installing HAProxy
use command apt-get to install
apt-get install haproxy
We need to enable HAproxy to be started by init script.
nano /etc/default/haproxy
Set "ENABLE=1"
Configuring HAProxy
Configuring HAProxy
Edit file /etc/haproxy/haproxy.cfg
strat with first block.

Log haproxy use rsyslog since ubuntu has installed rsylog in first place. Configuring rsyslog will be discussed in next post.
Alright, next we handle the next block like this.

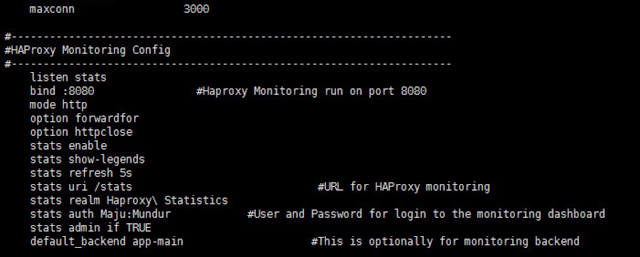
In this block, we configure haproxy panel, configure which port will be used in bind option. Configuring user and password can be done in auth option.

This settup is used for binding port 80 accessed by client.

And lastly this is configuration for load balancer. If you don't know what roundrobin mean, you can look at it in google. Option httpchk used for check host before forward the packet. Option server used for define nginx proxy pass which already configured.


Comments
Post a Comment