C# Tutorial for Beginner : Chapter 1 The beginning for All
C# is an object-oriented, modern, general-purpose programming language developed by Microsoft in the .NET framework led by Anders Hejlsberg. This tutorial series will teach you basic of C# programming and will also take you through various advanced concepts related to C# programming language.
You need to know if C# and .NET are interdependent but different parts. C# is a programming language whereas. NET is a framework that consists of libraries and runtimes that are useful for compiling C# code and other .NET programming languages such as VB.NET, F# and others.
Before you begin your journey to learn this programming language you need to set the environment to work with C#. First you need to install .NET framework. Install it is very easy just follow the instructions download. After the .NET framework is installed you then install the Integrated Development Environment (IDE) for you to write code and run your code easily. Visual Studio is a licensed product, so you must purchase a license for commercial use. But Visual Studio Express can be found freely for learning purposes. Download and install Visual Studio Express from www.visualstudio.com. I'll use Visual Studio Enterprise 2015 for all the C# tutorials. If you are a student where your college is working with Microsoft called MSDNA, you can get a free license from there. Usually you should contact to the campus to get MSDNA account.
Now let's try for the first thing done for the programmer to test whether the environment is installed properly. Hello World is a simple console program that was first created if someone learns a new programming language. The content is of course only a display of one or two texts in console. To make it in visual studio, first you, click the File menu in the upper right corner.
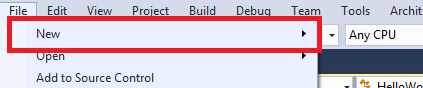
Next it will appear sub menu. Select it and click Project. In the future you can use shift+ctrl+N shortcut.

After you click on Project option then window menu will appear as follows

First select the Visual C# section to create a project with C# language. If you want to try to write in VB.NET or F#, you can scroll down and select that language. On the side column there are the types of projects that we can make. In this case we select Console Application. Then at the bottom there is the name of the project, the location of the solution and the project will be created, the Solution which is a collection of several projects, and the name of the solution will be made. If you are familiar with Java, it may be the same solution as Workspace in eclipse. Then click the Ok button.

After that, our project which has been created will appear. The orange box is the part where we write our code. In the blue box to the top right is a solution explorer. In that section we can find out what projects are in the current active solution. Moreover if you have lots of code file, it will be divided them into several files. This Solution Explorer will be our navigation to edit files with each other. In the purple bottom box is very useful if you select the Form Application project.
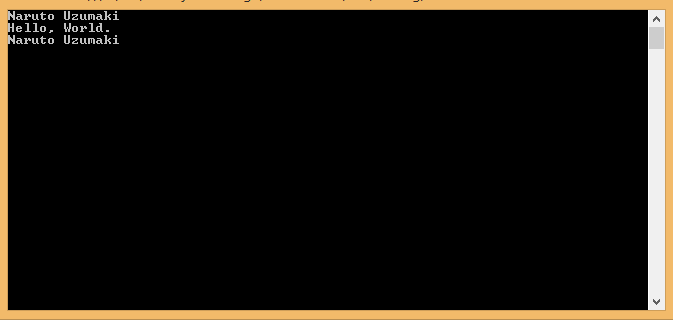
To make the program hello world consider the above program :
Results from the code above can be runned by pressing F5 on the keyboard or click the Start button in the toolbar below menubar.
You need to know if C# and .NET are interdependent but different parts. C# is a programming language whereas. NET is a framework that consists of libraries and runtimes that are useful for compiling C# code and other .NET programming languages such as VB.NET, F# and others.
Before you begin your journey to learn this programming language you need to set the environment to work with C#. First you need to install .NET framework. Install it is very easy just follow the instructions download. After the .NET framework is installed you then install the Integrated Development Environment (IDE) for you to write code and run your code easily. Visual Studio is a licensed product, so you must purchase a license for commercial use. But Visual Studio Express can be found freely for learning purposes. Download and install Visual Studio Express from www.visualstudio.com. I'll use Visual Studio Enterprise 2015 for all the C# tutorials. If you are a student where your college is working with Microsoft called MSDNA, you can get a free license from there. Usually you should contact to the campus to get MSDNA account.
Now let's try for the first thing done for the programmer to test whether the environment is installed properly. Hello World is a simple console program that was first created if someone learns a new programming language. The content is of course only a display of one or two texts in console. To make it in visual studio, first you, click the File menu in the upper right corner.
Next it will appear sub menu. Select it and click Project. In the future you can use shift+ctrl+N shortcut.
After you click on Project option then window menu will appear as follows
First select the Visual C# section to create a project with C# language. If you want to try to write in VB.NET or F#, you can scroll down and select that language. On the side column there are the types of projects that we can make. In this case we select Console Application. Then at the bottom there is the name of the project, the location of the solution and the project will be created, the Solution which is a collection of several projects, and the name of the solution will be made. If you are familiar with Java, it may be the same solution as Workspace in eclipse. Then click the Ok button.
After that, our project which has been created will appear. The orange box is the part where we write our code. In the blue box to the top right is a solution explorer. In that section we can find out what projects are in the current active solution. Moreover if you have lots of code file, it will be divided them into several files. This Solution Explorer will be our navigation to edit files with each other. In the purple bottom box is very useful if you select the Form Application project.
using System;


class Solution
{
    static void Main(String[] args)
    {

        String inputString;


        inputString = Console.ReadLine();

        Console.WriteLine("Hello, World.\n" + inputString);

    }
}
To make the program hello world consider the above program :
- The first line of the program that uses System, the keyword used is used to insert the "System" namespace into the program. A program generally has many use statements.
- The next line has a class declaration, the class 'Solution' contains the data definitions and methods our program uses. Classes generally contain many methods. Method defines class behavior. However, the class 'Solution' only has one method 'Main'. In one project you must have at least one main method.
- The next line defines the Main method, which is the entry point for all C# programs. The Main Method states what was done first when the class was running.
- String inputString; Declare a variable named 'inputString' which holds our input
- inputString = Console.ReadLine (); read a full line of input from stdin (cin) and store it into the declared 'inputString' variable
- Console.WriteLine ("Hello, World. \ N" + inputString); Print string literals with Hello World content and 'inputString'
- To print it you can just divide it in a different line with Console.WriteLine () as well.
Results from the code above can be runned by pressing F5 on the keyboard or click the Start button in the toolbar below menubar.

Comments
Post a Comment